Once you create your Optimizer(s), which was covered in the How to Set and Use UAhero's Optimizer blog post, you’ll start receiving daily recommendations to improve the performance of your campaigns and find more profitable users for your app.
How do Recommendations work?
After connecting your ad networks to the platform for your app and putting the campaigns in Optimizers, UAhero’s algorithm starts analyzing bids and budgets in the background at the most granular level possible for each ad network. Having said that, the granularity changes according to the ad network, the level can be source app for some ad networks such as Unity and ironSource, while for some ad networks like Facebook, TikTok and Snapchat it’s ad set level bidding. When you put campaigns from different networks in one Optimizer, UAhero works on the most granular level for each campaign and provides the Recommendations daily as long as the campaigns are active, spending and in an Optimizer. Recommendations are generated by the large set of machine learning algorithms running in the background, for optimizing the performance of your campaigns to achieve the goal set for the Optimizer (Target ROAS or Max Installs).
With Recommendations, you are still in control
The automation and machine learning / artificial intelligence capabilities make it possible to fully automate the bid/budget changes. However, when building UAhero, we decided that the user acquisition professionals should still be in control of the final actions to be taken. That is why we generate “recommendations” and give the opportunity for the platform user to review the actions before implementing them. As you’ll see below, UAhero’s Recommendations not only provides suggestions for the final actions to be taken but also additional metrics that enable the user to make informed decisions.
Where can I find the Recommendations?
Let’s take a look at the easy-to-use Recommendations screen to find out where and how you can see and apply these changes. To navigate to the Recommendations page, you need to click on Recommendations at the top bar.

On the Recommendations page, you’ll see a list of all the campaigns for all apps and ad networks, which are active and are assigned to an Optimizer. To easily navigate to a particular campaign of a specific app, platform or network, you can use the dropdown menus or the search box.

For instance, let’s continue by selecting the Unity Ads and Facebook networks and iOS platform to see Recommendations for each Unity Ads and Facebook campaign for iOS assigned to an Optimizer. As the screenshot below shows, you’ll be able to see the Optimizer name, the campaign name, the application icon and the date of Recommendations for selected networks and platforms.

You can scroll down and click on the little “>” symbol in each line to see details of recommended changes for the respective campaigns.
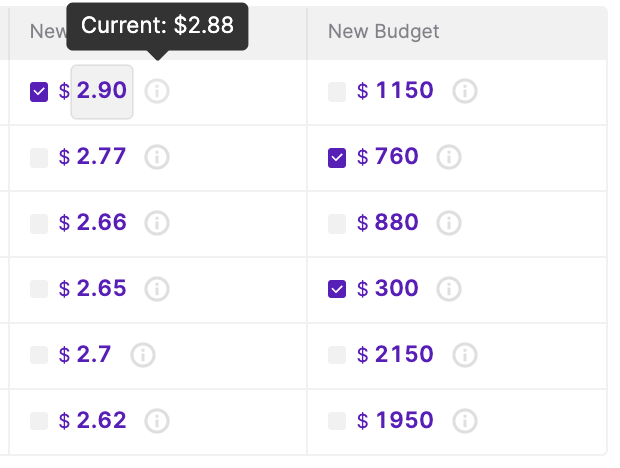
On the page with details, you’ll find the goal of the Optimizer, CPI and spend info of the previous day and also CPI of the last 7 days above the table. The main objective of the table is to provide the bid and budget values that should be applied and these are shown on the right-most columns. You can easily review and apply the recommended changes in less than no time.
Applying the Recommendations without leaving UAhero
.png)
In order to apply the changes, you can simply click on the checkbox next to the recommended value and then click “Apply”.
Moreover, you can edit the suggested bid and budget and enter the new bid or budget you have in mind for the ad group. Don’t forget to click on the “Apply” button after making the changes.

Additional insight on campaigns’ performance
While the main objective of the Recommendations page is to provide you with the bid and budget changes, there are additional columns in the table. The purpose of these columns is to give more insight into the performance of the campaigns so that the user can make a better judgment on the final bid/budget values to be applied. The values on these columns are generated by analyzing past data (such as how many days it takes for the users in an ad set to reach 50%, 75% of their lifetime value) and also making predictions related to the near future (such as how a 1 cent increase in the bid value would impact the number of installs).
If you’re not sure about the meaning of each column on the page, we’ve got you covered. You can hover over the metrics to see how you should interpret them, if you still have questions, don’t forget that your Customer Success Manager is always ready to help.
Differences between ad networks
Since the way the ad networks work can vary, there are small differences in the Recommendations screens for different ad networks. For example, while it is possible to see the “Applications” column for Unity Ads, since there is no such level for Facebook, that column won’t be visible for Facebook campaigns.
The applicability of bids and budget might also differ according to campaign settings and networks. Let’s say we have a campaign on Facebook with active Campaign Budget Optimization (CBO) and the lowest cost as the bidding option. As a result of the automation these settings provide, the suggestions for bids and budgets will be off. However, you’ll still be able to see the future LTV predictions calculated according to the trends of the newly acquired users. If you turn off CBO on this hypothetical campaign, you’ll be able to see and apply the budget suggestions on the platform, while changing the bidding option from lowest cost to bid cap will enable you to see the recommendations and make the bid changes on UAhero.
To make changes on some of the networks as AppLovin, you can download the recommendations as an Excel spreadsheet and carry out the application of recommendations on the AppLovin platform.


